It’s a good bet that you may need to create an estimate at some point if you sell products or services.
These days it’s common for customers to want an estimated cost before making a purchase. So just like knowing how to create an invoice, it’s equally important that you know how to create an estimate of your products/services. Using QuickBooks special reports, you can track the process of your estimates. For example:
Estimates works like creating an invoice.
In the upper left of the page, the estimate process is created by clicking on the New button, and then select Estimate.

With only a few differences creating an estimate, is similar to creating an invoice.
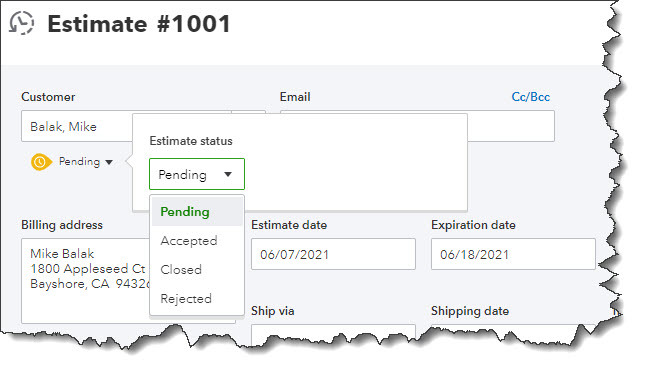
One difference you will notice when you open the form is that right below the Customer field, beside the small down arrow, you will see the word Pending, click to see your options. You will have the ability to update the status later. Next, choose a customer to begin. For new customers, click + Add New and enter the customer name. To build a more detailed profile, click Details and when the window opens just complete the fields. Click on Cc/Bcc to send someone else a carbon copy or a blind carbon copy.
Beside the Estimate date, you will see a field for Expiration date. After you enter those dates, add the products and/or services you wish to include. When creating an estimate for a new product/service, in the drop down list click +Add new. A panel will open from the right to allow you to create a new estimate.
At the bottom of the page, you will see more options. Here, you can either leave the default message or add a message in the box. You will also have the ability to Customize it, Make recurring, or Print or Preview it. When you’ve completed a reviewed your work, click Save and send the estimate to your customer.

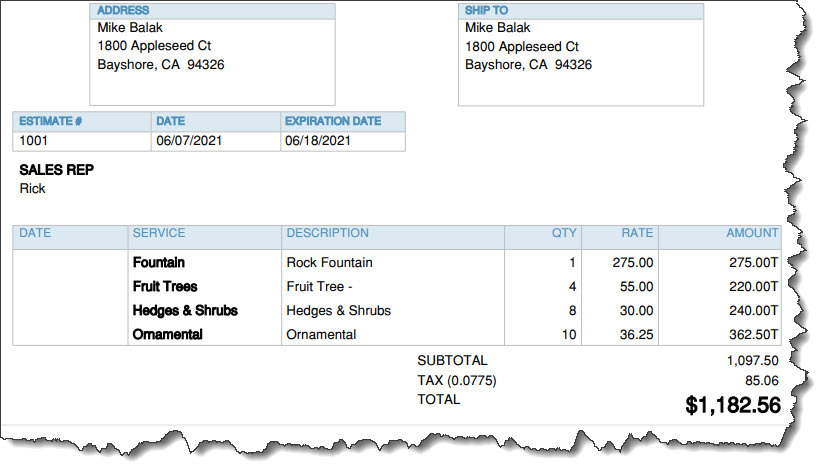
Before saving it, preview your estimate to see what your customer will see.
Updating the Status
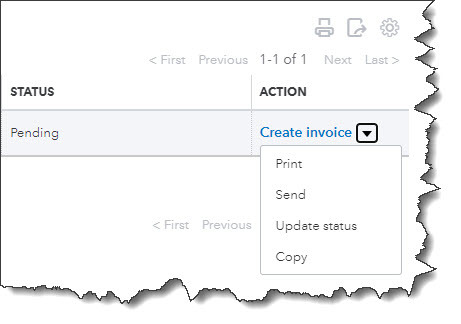
Until you accept it, the estimate will not be considered a transaction. To accept the estimate, in the toolbar, click the Sales link in the toolbar and then All Sales. You can see your estimate in the list by viewing the Type column. You can see other options by clicking the down arrow next to Create invoice, you will also see that you can Print or Send it or save a Copy.
Click on Update status. When the window opens, click on the down arrow by Pending. Choose Accepted In the drop down list or you can also mark it as Closed or Rejected. When you select any of the last 3 options, another window will open so that you can enter the name of the person who authorized the action as well as the date it was done.
If your estimate was accepted click Create invoice. Here you will have 3 options to invoice your customer.
- A custom amount for each line.
- A percentage of each line item.
- The estimate total.

After finding your estimate on the Sales Transactions page, you’ll have several options for managing it.
Once you have decided on a selection, click Create invoice to open the form with the amounts filled in based on your preference. If there is anything unfinished, complete the information. However, do not change any of the product or service line items. Click save and your invoice is ready. To check the status of your estimates run the Estimates by Customer report.
Using QuickBooks you can create and track your estimates as easily as working with invoices. So that you don’t lose money or sales it’s important that you get your estimates and their subsequent invoices exactly right.
Are you ready to get an edge on your competitors? At Summit CPA we offer multiple resources and techniques to help you get on the right track to attain your goals. For more information on how we can be of assistance to your company, contact our office at (866) 497-9761 to schedule an appointment with our advisors.
.png?width=120&height=77&name=Summit-Virtual-CFO_color_rgb%20(1).png)


